All of us have someone to inspire and fascinate us. This collection is all about the muses that we adore and idolize. Pick any of ours or let us know who inspires you and we upcycle a bottle for you. 

Have chosen the black and white color scheme to get the vintage look. The texture is created with gesso and black acrylic and then the print of the icon is decoupaged. Finished with acrylic varnish, this upcycled wine bottle makes a statement about you in your living space. 

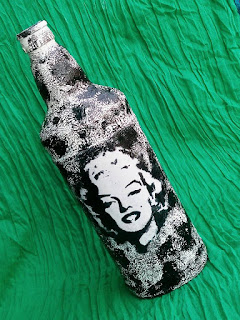
The one and only Marlyn Monroe, decoupaged on a bottle finished with black and white texture.


This ucpcyled bottle has image of Marlyn Monroe decoupaged on it and the textured created with gesso and acrylic color.
Marlyn Monroe 
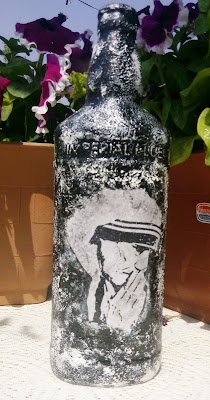
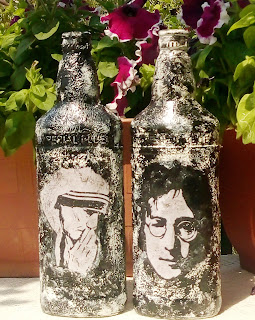
Mother Teresa - one of the greatest human beings that walked on this earth. Decoupaged on a bottle finished with black n white texture.


This recyled bottle has image of Mother Teresa decoupaged on it and the textured created with gesso and acrylic color.
Mother Teresa 

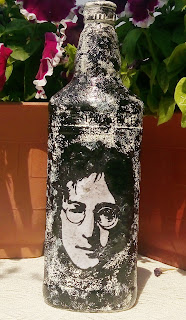
Famed singer-songwriter, the iconic John Lennon of Beatles fame, decoupaged on a bottle finished with black n white texture.
This recyled bottle has image of John Lenon decoupaged on it and the textured created with gesso and acrylic color.
John Lenon


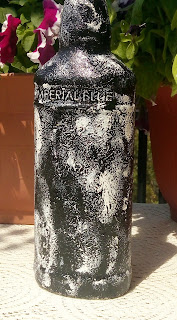
Back of recycled bottle by Anu Kriti
Back of the recycled bottle

Mother Teresa and John Lenon - recycled bottles by Anu Kriti. The images are decoupaged and added texture with gesso.
Inspirations


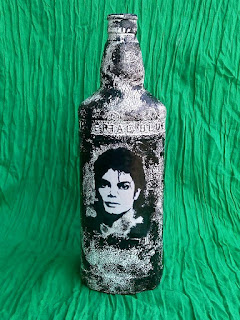
MJ - all time favourite - decoupaged on an upcycled bottle. 


This recyled bottle has image of Michael Jackson decoupaged on it and the textured created with gesso and acrylic color.
Michael Jackson 
Pick any of ours or let us know who inspires you and we upcycle a bottle for you. 
Contact details: +91 9310007286 or anu.kriti@yahoo.com


"She sells shells by the seashore. 
The shells she sells are surely seashells…”

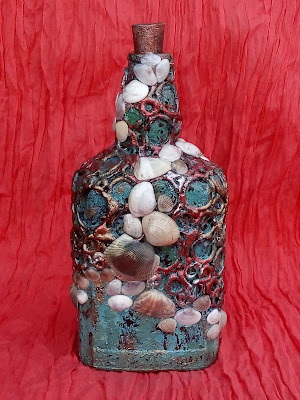
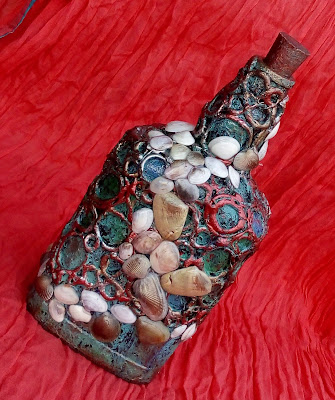
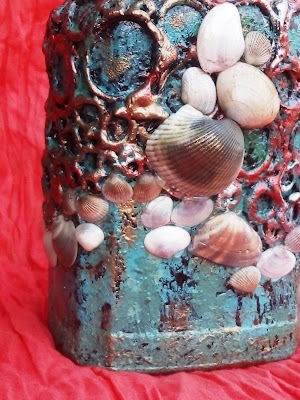
This recycled bottle is a handiwork after my trip to Mahaballipuram where we picked loads of sea shells. 

The rounds are handiwork of glue gun and the base color has been done in sea blue with little throw of copper, bronze and silver to give a rustic look. Then added the seas shells to complete this piece. 
Recycled Wine Bottle with Sea Shells
Sea Shells on Upcycled Wine Bottle

Decorated wine bottle with sea shells
Upcycled Wine Bottle - textured


The cork adds charm to this bottle decorated with sea shells.
 The cork adds charm!

A hint of copper and bronze highlights the textures created by glue gun on this recycled bottle
 A hint of copper and bronze
Check out Anu Kriti’s complete collection of upcycled bottles and other art pieces here
Creating deco art pieces from wine bottles has been the most fascinating thing for me in last few months. Experimented with various ways to create textures and then finish the bottle with different embellishments and styles. The most interesting one has been to use a shoe polish. 

Yes, you read it right… SHOE POLISH!

The possibilities are endless and outcomes are marvellous. Here are a few finished creations for you to see. 

Click here to see the complete collection

Click here to see the complete collection

Click here to see more personalized altered wine bottles

Click here to see the complete collection


Let's see hwo to go about it. To prep the base, all you need is:
  •        A wine bottle  (any shape, size you wish to work with)
  •         A masking tape or a decoupage paper
  •         Metallic acrylic colors like bronze, gold or copper
  •         Of course the magical shoe polish
  •         Acrylic Varnish

Step 1: Start by cleaning and drying the bottle. How to clean and get rid of the labels, read here.

Step 2: Take a masking tape and tear off strips or random shapes and start covering the bottle, overlapping each piece. Press the edges firmly on the bottle. Take special care while sticking the masking tape around the rim & neck of the bottle and at the base since the surface is uneven. 

You can also decoupage the bottle with tissue paper or any other paper to cover the bottle. I have used  masking tape.

Strips of masking tape 
Bottled covered with masking tape
Bottles of different sizes covered with masking tape


Step 3: Once, the bottle is fully covered with masking tape. Take the shoe polish and start rubbing it on the bottle. You will see the overlapped edges showing out prominently. Rub the polish evenly all through the bottle. I have used brown tan color to get that rich color.


Polish rubbed on the bottle evenly

Darken and lighten 
 Step 4: Now, to create a more magical texture and color play, darken a few patches by applying more of polish. You can also lighten a few by wiping with a cloth. Continue to darken or lighten here and there till you are happy with what you see.


Different sizes base readied with shoe polish technique


Step 5: Keep the polished bottle in sun to dry. Leave it for atleast 4-5 hours. It will take away the smell of the polish and also dry it faster. If can’t keep it in sun, let it stay for at least one day or till the time the whole polish is absorbed and the surface is dry and ready to work further.

Step 6: The rich color of the polish can be accentuated by adding some metallic finish to it. Dab a sponge with the any of these – bronze, gold or copper acrylic color and rub it on the bottle. You can rub on some parts and leave the rest or rub it all through very lightly.

Step 7: Let it dry.

Step 8: Spray varnish on the bottle and let it dry. You will love the light and dark effect glazed with metallic color shining through.

Step 9: Finish the bottle by using different styles and embellishments. 


Few tips:
  •  Make sure the bottle is totally dry when masking tape is put on, otherwise it will not stick and come off after some time.
  • Take good quality masking tape so that the glue stays in place and edges do not come off.
  •    Do not use a large amount of polish in the first go. Apply a little first so that the masking tape absorbs the wax and oil of the polish evenly. Then darken and lighten as per your choice.
  • You can use the varnish after you have finished decorating the bottle with trims, pearls, beads, buttons, laces etc. or varnish the base first and then add the embellishments.  I varnish the bottle first if the decorating material is an absorbent one like jute since the varnish on the jute will take away the natural look of the jute. I varnish it later if the embellishments are all non-absorbent substances and need sheen and protection like beads, clay flowers, pearls etc.
  •  Always spray varnish in an open place like a garden, terrace or balcony and cover your face appropriately. It’s poisonous to use it inside the house.
Keep watching this space for some more fun ideas to create texture on the bottles.

Check out Anu Kriti’s complete collection of upcycled bottles and other art pieces here.  


Last year has been a whirlwind one - juggling between home, job, kid and family! But Anu Kriti always found its place in my daily routine and have been posting my creatives on the Facebook Page.

Lately Upcycled Wine Bottles have caught my fancy and have been dabbling into altered bottles mostly. It has got very good response. Posting a few here. Check all the collections here.

Will be posting some interesting posts soon!


Latest Collection


Upcycled Wine Bottles

Perosnalized Wine Bottles

Perosnalized Altered Wine Bottles


'Women's Day', 'Women Empowerment' sound fancy words to many. The hype and buzz at times puts me in doubt - is it just the commercialization of a very sensitive issue or is it the genuine concern of NGOs, govt. organizations and corporates because the difference is not much. Have always been of the belief that each day is my day, why restrict it to one single day or a week (it's International Women's week). 

However watching programs like Satyamev Jayate's (2nd season opening episode),  actually made me realize whatever the hype or buzz is, it's very little because our causes actually require attention and concern of the society in a bigger way. Whatever these organizations are doing is just a drop in the sea and this little effort is commendable.

And as luck would have it, Anu Kriti got a chance to add to this buzz by participating in a group Art Exhibition organized by Uchaan Group during the International Women's Week. The event has been appropriately named as Soul's Expression (6th - 9th March 2014). Each art piece is a story to tell. Honoured to have Ms. Shamina Shafiq (member of National Women's Commission opened the first episode of Satyamev Jayate) to inaugurate the event. She rightly added to the spirit of celebrating womanhood:

"The combination of women and art are one of the solutions to make this world a better place. And art takes away the feeling of being trivial and non-contributor from the psyche of a housewife and for that matter a working women. It gives a purpose, a meaning and an expression."


It has been an exhilarating experience, showcasing my work with such senior artists. More rewarding has been the association with these women of different ages coming from different walks of life on one common platform. Have been sharing experiences of life in general and our individual art styles.

More importantly celebrating WOMANHOOD! Admitting that if there is a re-birth then all of us would only want to be born as women again, agreeing that upliftment of women does not mean to weaken men's status but finding a common ground wherein we (women and men) are complementary and not competitors, enjoying the journey of being an artist and thanking the fact that a SOUL DOES NOT HAVE A GENDER!

Anu Kriti's Collection at Soul's Expression

My first blog post was an introspection - I am there, but have I arrived…

Abhi To Asli Manzil Pana Baqi Hai
Abhi To Irado Ka Imtihaan Baqi Hai
Abhi To Toli Muthi Bhar Zamin
Abhi Tolna Asman Baqi Hai  
(in words of Anurag Rishi)

Look forward to many more rewarding experiences like this.
UpCycled Wine Bottles from Anu Kriti
The party over the weekend was a rocking one and what it has left is a whole mess to clean up and that includes empty wine or liquor bottles! These wine bottles usually find their way to a kabadiwala. But the creative you can actually transform these empty bottles into beautiful vases or simply deco art pieces. Believe me you won’t stop gushing with pride when your guests just can’t take off their eyes from your exclusive art pieces – the Upcycled Wine Bottles!

You can decoupage the bottles with paper or cloth or paper napkins or paint them with acrylic, spray or car paint or glass paints. Embellish them with all sorts of knick knacks lying around in your home or create your own embellishments. Here's how you can do it! 

Pick up a bottle that you like the shape of and clean it thoroughly. You can take off the labels by dipping the bottle overnight in soapy water. Most of the labels come off easily. For the stubborn ones use a coarse cloth. Clean the bottles in and out with soap water and turn them upside down to dry. 

I personally love decoupaging.  Every piece comes out with unique effect. Another bit I love to do is to give it a washed look. Here is how I do it.
  1. Take out any old magazine and tear out pieces of different sizes and shapes. Don’t use scissors. Don’t tear out too large or small pieces. 
  2. Now make the decoupage medium (mix adhesive and water mixture in rato of 1:1). 
  3. Start from one edge of the bottle and brush the surface with the decoupage mix and stick the magazine tear outs. Brush over with the adhesive mix. You can arrange the bits of paper in a pattern or random or whatever way you like. 
  4. Once, the whole bottle is covered, let it dry (usually one day). 
  5. Once it’s dry, coat it twice again with the decoupage medium, giving time in between to dry.

Now the fun part, how to give it a stone wash look!

Get thinner from a paint shop (a liquid used to thin paints). Dip some cotton and rub on the dried decoupage bottle. You will see the print ink coming off. The harder you rub, more ink colors will bleed. Rub it harder or softer depending on the amount of ink you want to rub off or keep on. Here is how it will look.

Decoupage bottle washed with thinner
Next you can decorate it. I have done up one with quilling. 


Decorated with quilling
For the other one, have simply tied a cord around the neck of the bottle and wrapped it around the mouth. 

Decorated with cord and buttons

Next technique is creating textures on the bottle like this one. 

Texture created with paper napkin
Have created texture with paper napkins. Since, we are going to apply color on top of it, so you can use even a cheaper toilet roll. Start from the step 3 as above but use paper napkin. Instead of keeping the surface plain, create textures. Create creases in the paper with brush while applying the decoupage medium. Coat it twice. Let it dry completely between layers. Once the intended texture effect is created, let it dry and then apply a coat of acrylic color. If need be apply another coat.

Now take some highlight color on a sponge and rub over the raised texture. You can do this with a flat brush as well. You will get this effect.

Highlight texture with a metallic color

 Embellish it the way you like. I have used some cords, buttons, cloth flowers, beads etc.  


Highlighted with metallic copper and embellished with cords, flowers and beads

Highlighted with metallic silver, embellished with cord and decorative buttons
Don’t forget to seal your art piece with a sealer (two coats). Do it before you add the embellishments. 

So, it’s time for your imagination to run wild, create your own masterpieces and bring joy to your living space with your own creations like these.

Check out Anu Kriti's collection of Upcyled Wine Bottles here


63794FVYRDEX
Crayons are one of the easiest colour medium to use. No mess, no bleeds, all too smooth until I discovered a way to mess around with them.  

And this mess looks so beautiful! 

Acrylic and Crayon Painting - Threesome
Threesome
The background of this painting has been created with crayons and the colourful flowers in the foreground are done with acrylic colours.

The crayon background is not the usual technique of colouring with crayons. The crayons have been shredded and melted! 

The Process
  • Get crayons of the colours depending on what you want to create. Like for this one, to create the sky, I shredded around four shades of blue starting from the darkest to the lighter blues. For the foreground cover, I used bright yellow and shades of green. 
Each box has 12 different shades. So for larger number of crayon of the same colour, you got to buy multiple packs :-)


Crayons
  • Remove the paper cover from each one of them. Now that’s the boring part.
  • Shred the colours. You can use a sharpener or a shredder, whichever suits you. Shred each colour separately. 
Shredded Crayons
  • When you are ready with all the colours, spread them on the base (I have used a canvas board). Mixing shades here and there as you would do while painting with water colours or acrylics.
  • Next step is to take a butter paper and cover the whole spread with it.
  • Switch on the iron (warm worked for me) and start from one corner and you will see the magic. The colors will start mixing. Move the iron lightly. 
  • When yo are satisfied with the effect you want to create, switch off the iron and wait. 
  • When the crayons solidify, remove the butter paper and there you go!
Crayon Background
Finally, I created the flowers with acrylic colours, using colours directly from the tubes on to the background.

Acrylic Flowers
Things can really go out of hand at times that is the colours mix too fast and you dont get the intended mix of colours, the base becomes uneven and so on. The mantra is patience, especially when you are melting the crayons for the first time. I would suggest don’t start straight away on the actual base you wish to use. 

Experiment a bit to decide
  •           how many crayons are required to fill
  •           how warm or hot the iron should be
  •           what amount of pressure to apply

So, hop on the CRAYON CARAVAN and have fun!

P.S. This crayon acrylic mix is one of paintings from the set ‘Threesome’. The collection is ‘Gardenia’. 

Threesome


Powered by Blogger.